Unit 1 · 17 min read
Safety, Tools and the Components of a PC
What the syllabus asks for 6
- Safety first
- The toolkit
- Inside the PC: components and what their specs mean
- Compatibility checklist
- Calculations for choosing parts
- Eight rules of safe and careful workshop practice
Hardware Workshop is a hands-on subject: you open a computer, identify every part, assemble one, install an operating system, fix faults and crimp a network cable.
This unit prepares you: safety rules, the toolkit, and a working knowledge of each component and how to read its specification, with the calculations you need to choose parts that fit and work together.
- Electrical and static safety; the technician's toolkit.
- Every PC component: case, motherboard, CPU, RAM, storage, PSU, GPU, ports, with the specifications that matter.
- Compatibility rules, and calculations for power supply, memory and storage speed.
1.1 Safety first
Electrostatic discharge (ESD). A static spark you cannot even feel (under 3,000 V) can destroy a chip.
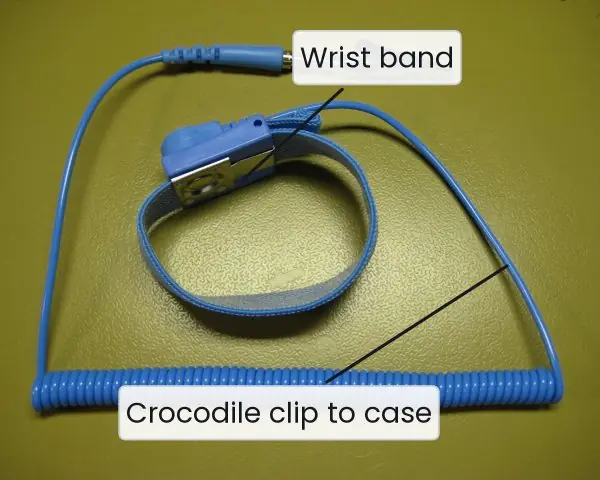
Use an anti-static wrist strap clipped to bare metal on the case, or touch the case frame before handling parts; hold cards by their edges; keep parts in anti-static bags until installation; work on a hard, uncarpeted surface.
Electrical safety. Switch off and unplug the PC before opening it, and press the power button once to drain the residual charge. Never open a power supply unit (PSU): its capacitors hold dangerous voltage even when unplugged.
Do not work with wet hands; use a surge-protected supply or UPS; keep liquids away.
Physical safety. Case edges are sharp; lift heavy items with the legs; keep a clear bench; tie back long hair and loose sleeves near fans; use goggles when blowing out dust and a mask for heavily dusty machines.
Handle CRT monitors and old batteries carefully (lead, mercury).
Fire and environment. Know the fire extinguisher (CO₂ or dry powder for electrical fires, never water); dispose of batteries, toner and old boards as e-waste, not in the rubbish.
Good practice: record every cable and screw location (take photos), use the right screw (the case, board standoffs and drives use different sizes), do not force connectors (they are keyed), and back up data before any repair.
1.2 The toolkit
| Tool | Use |
|---|---|
| Phillips (#1, #2) and flat screwdrivers, magnetic tip | screws; small #0 for laptops |
| Torx and Allen keys | some cases, laptops |
| Anti-static wrist strap and mat | ESD protection |
| Tweezers, needle-nose pliers, parts tray | jumpers, dropped screws, bent pins |
| Cable ties, Velcro straps | cable management |
| Thermal paste and isopropyl alcohol (≥ 90 %) with lint-free cloth | CPU cooler installation and cleaning |
| Compressed air or a blower, soft brush | dust removal |
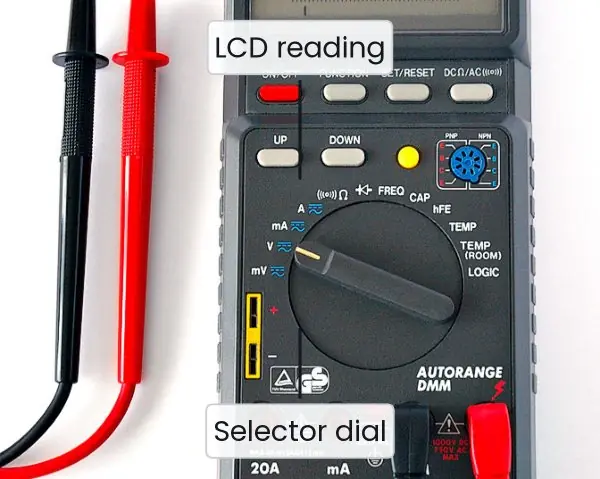
| Multimeter | check PSU rails, continuity, batteries |
| PSU tester | quick PSU check |
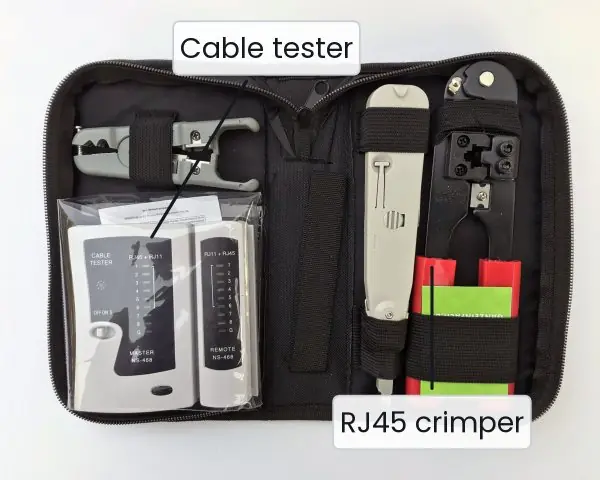
| Network cable crimper, RJ-45 connectors, cable tester | LAN cables |
| POST diagnostic card, spare known-good parts | fault finding |
| Bootable USB (OS installer, live Linux, diagnostics), driver disks | software side |

1.3 Inside the PC: components and what their specs mean
Case (chassis). Sizes follow the motherboard form factor: full/mid tower (ATX), mini tower (micro-ATX), small form factor (mini-ITX). It provides mounting for the board (brass standoffs), drives, fans, front-panel ports and the PSU.
Airflow: front intake, rear and top exhaust.
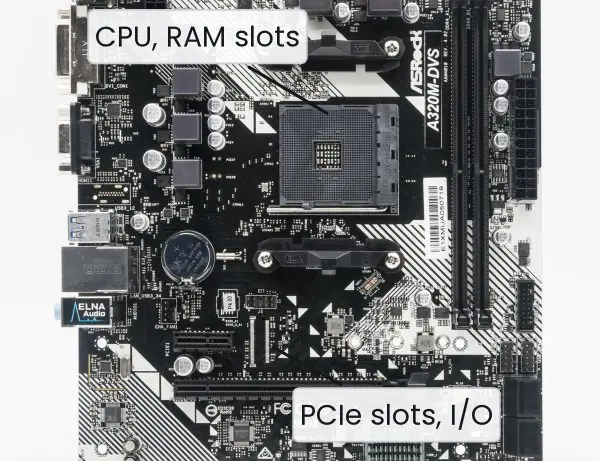
Motherboard. The main circuit board joining everything.
Key features: socket (CPU type, e.g. LGA1700, AM5), chipset (decides features and ports), RAM slots (DDR4 or DDR5, not interchangeable), expansion slots (PCIe x16, x4, x1), M.2 slots (NVMe SSD), SATA ports, BIOS/UEFI chip and CMOS battery (CR2032, 3 V, keeps the clock and settings), front-panel header (power, reset, LEDs, USB, audio), 24-pin ATX and 4/8-pin CPU power connectors, and rear I/O.
CPU. Specified by cores and threads, base/boost clock (GHz), cache (L1 to L3), TDP (thermal design power in watts), and socket. More cores help parallel tasks; clock and cache help single-thread speed.
Needs a heatsink and fan (cooler) with thermal paste (a pea-sized dot) to carry heat to the cooler.
RAM. DDR4 or DDR5 DIMMs (laptops use shorter SO-DIMMs). Specified by capacity, speed (e.g. DDR4-3200 = 3200 mega-transfers/s) and latency (CL). Use matched pairs in dual channel (the right slots, per the manual) for double bandwidth.
Storage.
HDD spinning platters, cheap per GB, 5400/7200 rpm, SATA.
SSD (SATA) flash, no moving parts, ~550 MB/s.
NVMe SSD flash over PCIe in an M.2 slot, 2,000 to 7,000+ MB/s. Optical drives are now rare.
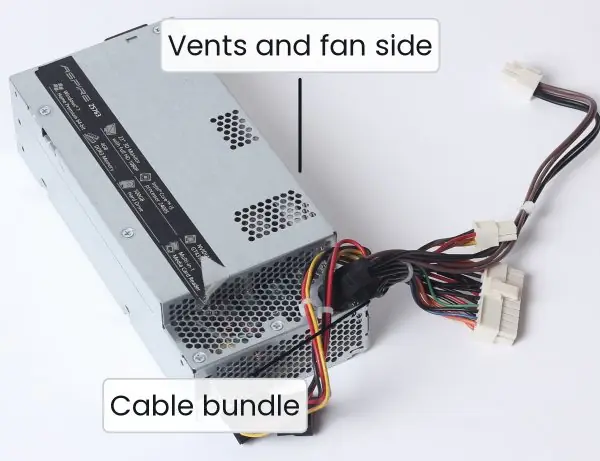
Power supply unit (PSU). Converts mains AC (230 V in Nepal, 50 Hz) to DC rails: +12 V (CPU, GPU, drives), +5 V, +3.3 V. Rated in watts; the 80 PLUS label (Bronze, Silver, Gold, Platinum) gives efficiency (e.g. Bronze at least 82 % at 50 % load).
Connectors: 24-pin ATX, 4+4-pin EPS (CPU), PCIe 6+2-pin (graphics), SATA power, Molex.
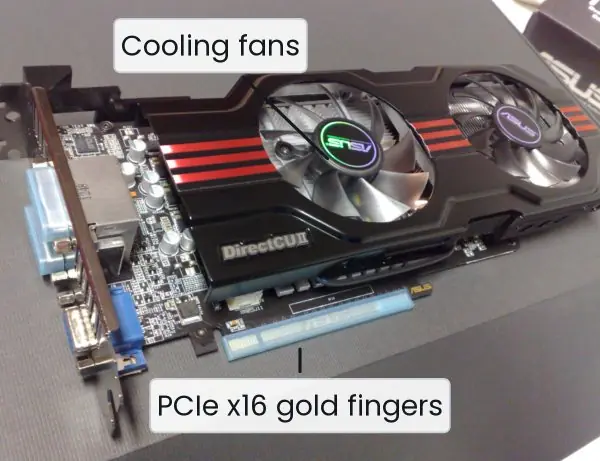
Graphics card (GPU). Needed for gaming, 3D, video work and AI; otherwise the CPU's integrated graphics suffice. Specs: VRAM, memory bus, power connectors, length (check the case).
Cooling. Air (heatsink and fans), liquid (AIO radiator), case fans; thermal paste fills microscopic gaps. CPU idle temperature 30 to 45 °C; load below about 85 °C.
Ports and connectors
| Port | Use | Note |
|---|---|---|
| USB-A / USB-C | peripherals, charging | USB 2.0 480 Mb/s; USB 3.0 5 Gb/s; 3.2 Gen 2 10 Gb/s; USB4 up to 40 Gb/s |
| HDMI / DisplayPort | monitor | DP supports high refresh rates |
| VGA (analog) / DVI | old monitors | being retired |
| RJ-45 | Ethernet | 100 m max, 1 Gb/s common |
| 3.5 mm jacks | audio | green line out, pink mic, blue line in |
| PS/2 | old keyboard and mouse | purple and green |
| SATA data | HDD/SSD | 6 Gb/s |
1.4 Compatibility checklist
- CPU socket equals the motherboard socket; the chipset supports that CPU generation (BIOS update may be needed).
- RAM type (DDR4 or DDR5) matches the board; speed is supported.
- Case form factor accommodates the board; GPU length and cooler height fit.
- PSU has enough wattage and the right connectors.
- Storage interface: M.2 slot supports NVMe (and/or SATA); enough SATA ports.
- OS supports the hardware (for example Windows 11 requires UEFI with Secure Boot and TPM 2.0).
1.5 Calculations for choosing parts
(a) Power supply sizing. Sum the component peak draws and add 30 to 50 % headroom, then round up to a standard rating.
CPU 65 W + graphics card 150 W + motherboard, RAM, SSD, HDD and fans about 60 W = 275 W. With 50 % headroom: 275 × 1.5 = 412 W, so choose a 450 W (or better 500 W) 80 PLUS Bronze unit.
At 50 % load a Bronze supply is about 85 % efficient (82 % guaranteed), so its input draw is 275 / 0.85 ≈ 324 W from the wall.
(b) Memory bandwidth. Peak bandwidth = transfer rate × bus width. DDR memory uses a 64-bit (8-byte) channel: DDR4-3200 gives 3200 × 10⁶ × 8 B = 25.6 GB/s per channel; dual channel doubles it to 51.2 GB/s. DDR5-5600 gives 5600 × 8 = 44.8 GB/s per channel.
(c) Interface speeds. SATA III signals at 6 Gb/s with 8b/10b encoding (10 bits on the wire per data byte): 6 × 10⁹ / 10 = 600 MB/s, giving real SATA SSDs about 550 MB/s.
NVMe on PCIe 3.0 x4: 8 GT/s per lane with 128b/130b encoding, so 8 × (128/130) / 8 = 0.985 GB/s per lane; four lanes = 3.94 GB/s. PCIe 4.0 doubles that to 7.88 GB/s.
(d) How long does a copy take? Copying 50 GB at 100 MB/s (a HDD) takes 50,000 / 100 = 500 s ≈ 8.3 min; at 500 MB/s (SATA SSD), 100 s; at 3,000 MB/s (NVMe), about 17 s.
(e) Storage marketing vs reality. A "1 TB" drive is 10¹² bytes; Windows reports capacity in binary units: 10¹² / 2³⁰ = 931 GiB (shown as "931 GB"). Nothing is missing; the units differ.
(f) RAID capacity. With n drives of size S: RAID 0 (striping) = n × S, no redundancy; RAID 1 (mirror) = S (two drives); RAID 5 = (n − 1) × S, survives one failure; RAID 6 = (n − 2) × S, survives two; RAID 10 = (n/2) × S. For four 2 TB drives: RAID 0 = 8 TB, RAID 5 = 6 TB, RAID 6 = 4 TB, RAID 10 = 4 TB.
RAID is not a backup: it will happily copy accidental deletion, ransomware and fire damage.
(g) UPS sizing. UPS capacity is in VA; real power (W) = VA × power factor (about 0.6 for small units). A 300 W load needs at least 300 / 0.6 = 500 VA; add 25 % headroom: 625 VA, so buy a 650 or 700 VA unit.
A 12 V 7 Ah battery stores 84 Wh; at 85 % inverter efficiency and a 300 W load: 84 × 0.85 / 300 ≈ 0.24 h ≈ 14 minutes at best, enough to save and shut down properly.
1.6 Eight rules of safe and careful workshop practice
- Switch off and unplug first. Turn off the PSU switch and pull the power cable before opening the case. Even when the computer is "off", the motherboard keeps a small standby voltage. This one habit prevents most shocks and burnt boards.
- Discharge static electricity. Wear an anti-static strap clipped to bare case metal, or touch the metal often. A spark you cannot feel (below 3,000 V) can still kill a RAM chip. Dry winter air in Kathmandu makes static much worse.
- Never open a power supply. The capacitors inside hold dangerous voltage for days after unplugging. Replace a faulty PSU as a whole and never repair it in a college lab. A shock from it can stop the heart.
- Handle parts by the edges. Hold RAM, cards and the motherboard by their edges, never by the gold contacts or chips. Keep parts in their anti-static bags until use. Oil from fingers and tiny scratches cause hidden faults.
- Use the right tool and the right force. Use a magnetic Phillips screwdriver, and tighten only until snug. Parts should slide in with firm, even pressure; if they do not, check the notch and the direction. Forcing a CPU or RAM stick bends pins and breaks slots.
- Keep a tidy bench. Work on a clean, dry, non-metal table with the screws in a small tray. Label cable positions with a photo before removing them. A lost screw under the motherboard can cause a short circuit.
- Protect the data. Back up important files before opening, formatting or reinstalling. A technician is trusted with a customer's photos, accounts and exam files. Never view or copy private data.
- Think about people and environment. Lift heavy cases with a straight back, keep cables out of walkways and use a fire extinguisher rated for electrical fires. Hand old batteries, monitors and boards to an e-waste collector instead of burning or dumping them. Nepal has few recycling points, so responsible disposal is part of the job.
Formula and fact sheet
- ESD: wrist strap, anti-static bags, touch the case. Never open a PSU.
- Compatibility: socket, RAM type, form factor, PSU wattage and connectors, storage interface, OS requirements.
- PSU watts = (sum of component peak) × 1.3 to 1.5.
- RAM bandwidth = MT/s × 8 bytes. SATA III ≈ 600 MB/s; PCIe 3.0 ≈ 0.985 GB/s per lane.
- 1 TB (decimal) = 931 GiB. RAID 5 = (n − 1)S; RAID 10 = (n/2)S.
- UPS VA = W / 0.6; add headroom.
Chapter summary
- Protect yourself and the parts: unplug, discharge static, never open a PSU.
- The toolkit is small and cheap; a multimeter, crimper and a bootable USB solve most jobs.
- Every component has a few specifications that decide compatibility and performance.
- Simple arithmetic selects the PSU, UPS and storage layout and explains real speeds and capacities.
Practice
- List six safety precautions before opening a computer.
- Why is it dangerous to open a PSU, and what should you do if it is faulty?
- Name the main parts of a motherboard and the purpose of the CMOS battery.
- A PC uses a 95 W CPU, a 200 W GPU and about 80 W of other parts. Choose a PSU rating.
- Find the peak bandwidth of dual-channel DDR4-2666.
- How long to copy 120 GB over SATA III (assume 500 MB/s) and over a USB 3.0 HDD (assume 100 MB/s)?
- How many GiB is a "500 GB" drive?
- Compute the usable capacity of five 4 TB drives in RAID 5 and RAID 6.
- Choose a UPS for a PC and monitor drawing 250 W.
- A PC will not accept the new CPU in the old board. List three compatibility checks.
Answers and worked solutions
1. Shut down and unplug; press power to discharge; wear a wrist strap or touch the case; remove jewellery; use anti-static bags; clear dry, well-lit workspace.
2. Capacitors in the PSU keep a lethal charge after unplugging. Replace a faulty PSU as a unit; never repair it.
3. CPU socket, chipset, RAM slots, PCIe slots, M.2/SATA connectors, BIOS chip, front-panel header, power connectors. The CMOS battery keeps the real-time clock and BIOS settings when the PC is off.
4. 95 + 200 + 80 = 375 W; × 1.4 ≈ 525 W, so a 550 W 80 PLUS Bronze or better.
5. 2666 × 8 = 21.3 GB/s per channel; dual channel = 42.6 GB/s.
6. 120,000 MB / 500 = 240 s = 4 min; 120,000 / 100 = 1,200 s = 20 min.
7. 500 × 10⁹ / 2³⁰ = 465.7 GiB.
8. RAID 5 = (5 − 1) × 4 = 16 TB; RAID 6 = (5 − 2) × 4 = 12 TB.
9. 250 / 0.6 = 417 VA; with 25 % headroom 521 VA, so a 600 VA unit (runtime a few minutes).
10. The CPU socket matches; the chipset and BIOS version support the CPU; the cooler fits that socket (and the PSU can supply its TDP).
Model answers: medium (5 marks) and long (10 marks) questions
Q (5 marks). List the safety precautions a technician must follow while assembling or repairing a PC. Why is ESD dangerous?
Electrostatic discharge (ESD) is a sudden flow of static charge between two objects at different voltages.
A person can carry 3,000 V or more without feeling anything, while a RAM or CPU chip can be damaged by only 100 V, so the part may be killed or weakened without any visible sign. Its failure may appear weeks later as random crashes.
Precautions (see Plate 1.1):
- Switch off the PSU, unplug the mains cable and press the power button once to drain the board.
- Wear an anti-static wrist strap clipped to bare case metal, or touch the case frequently.
- Work on a clean, dry bench; avoid carpet and nylon clothes.
- Hold components by their edges and keep them in anti-static bags.
- Never open a power supply, and never use a metal tool near live circuits.
- Use the correct screwdriver and do not force any part.
- Back up data before starting, and dispose of old parts as e-waste.
| Hazard | Cause | Prevention |
|---|---|---|
| Electric shock | live PSU or monitor | unplug; never open PSU |
| ESD damage | static from body | wrist strap, edges only |
| Cuts | sharp case edges | careful handling, gloves |
| Short circuit | loose screw, wet bench | tidy dry bench |
| Fire | overloaded socket | surge-protected strip, extinguisher |
Q (10 marks). Describe the main components of a desktop PC and explain how to choose compatible parts. A student plans a PC with a 65 W CPU and a 150 W graphics card; calculate the power supply rating.
Introduction. A desktop PC is built from separate, standard parts that are joined by the motherboard (Figure 1.1). Knowing the job and the main specification of each part allows a technician to choose a balanced and compatible system.
Components and key specifications (Plate 1.2).
- Case: holds and cools the parts; sizes ATX, micro-ATX and mini-ITX; has fans, drive bays and the front-panel connectors.
- Motherboard: the main circuit board; its socket decides the CPU, its slots decide the RAM type and number of cards, and its chipset decides features.
- CPU: the processor; judged by cores, threads, clock speed (GHz) and cache; needs a cooler and thermal paste.
- RAM: the working memory, such as 8 GB DDR4; must match the board's DDR generation and speed.
- Storage: HDD (cheap, large, slow) or SSD (SATA or NVMe, fast); the OS should be on an SSD.
- PSU: converts 220 V AC to the 12 V, 5 V and 3.3 V used inside; rated in watts and 80 PLUS efficiency.
- Graphics card: needed for games and design; many CPUs have a built-in GPU that is enough for office work.
- Ports and cooling: USB, HDMI, LAN and audio ports; fans or a liquid cooler remove heat.
Compatibility rules. (1) CPU socket = motherboard socket (for example AM4 or LGA1700). (2) RAM generation (DDR4 or DDR5) = board support, because the notches differ. (3) Case form factor must fit the board.
(4) The graphics card must fit the case length and have the power connectors from the PSU. (5) The PSU must supply enough watts and the right connectors.
Power supply calculation. Add the maximum power of the parts: CPU 65 W + graphics 150 W + motherboard and RAM 40 W + SSD and HDD 15 W + fans 10 W = 280 W.
Allow a 40 to 50 % margin for peaks and ageing: 280 × 1.5 = 420 W. The next standard size is a 450 W PSU (a 500 W unit is a safer choice). A PSU run near its full rating is hot, noisy and short-lived.
| Part | Match with | Example mismatch |
|---|---|---|
| CPU | motherboard socket | LGA1700 CPU on an AM4 board |
| RAM | board DDR type | DDR5 stick in a DDR4 slot |
| Board | case form factor | ATX board in a mini-ITX case |
| GPU | slot, case length, PSU connectors | 300 mm card in a 250 mm case |
| PSU | total watts | 300 W PSU for a 420 W build |
Conclusion. A good PC is a balanced one: a fast CPU with slow memory or an undersized PSU wastes money and causes faults. Check the compatibility table before buying any part.